Monday, 6 June 2011

LOOK WHAT I GOT DONE!

As you get older I think you think of the things you've achieved or not achieved in your life and as I am not too far off the grand old age of 60 I started thinking of things I'd like to do - nothing drastic like bungee jumping off a building or anything as daring as that!  But little, personal things. 

The first thing I did a year ago now, was get my ears pierced twice more so that I now have 3 sets of earrings on each ear!  Why? Cos I wanted too - simple as!

The next thing I did was in April this year.  I wanted to do something a bit different for me and Mike's anniversary. He's a very insecure chap really and is always saying that he can't understand how (in his words), a beautiful and confident woman like me, can love someone shy and insignificant as him! Now as much as I try to reassure my darling husband that he means the world to me he still sometimes feels like that.

So........I thought of my idea, told my friend Sue and before I knew it - was in the shop ordering what I wanted!  The very next day I went to fulfill my idea.  It was a tattoo!!

I decided to have it on my erm....butt!  cos it wasn't so much for anyone else to see but for my Mike to look at!  So wanna see it?  sure you do......
So as you can see it's two red roses either side of a heart with a banner across it with Mike's name on it!
I had it done the week before our 6th wedding anniversary and managed to keep it a secret from Mike! how, you might ask?  Well I happened to have been quite ill with pleurisy and when I'm poorly, I always sleep in Pj's or nightie........So, I managed to keep it covered up from him!! hee hee!

To say he was absolutely amazed and gobsmacked is an understatement!!  He was so touched that I had gone through a lot of pain to show him - permanently, how much he means to me and how much I love him!

A couple of weeks later he started talking about getting one of his tattoo's re-worked and having my name put on him!!  Wow!  I had been longing for him to do that for years! But this actually moved him to do it! 

So off we went to the tattoo shop - which by the way, was a brand new shop set up in our town, which is nice and clean and the chap Michael, does a good job! See his work on his Facebook page:-
 (http://www.facebook.com/profile.php?id=100001707695252&ref=ts).  Mike told Michael what he wanted and then we went back the next day to get it done.  It used to be an old faded rose - here is what Michael done....


So Mike had a red rose and a heart too but also wanted a bluebird and then the banner with the name Sal on it - I love it! 

Now I'm wondering what to do next lol........................

Tuesday, 17 May 2011

MY CHROCHET ATTEMPTS!

After seeing Emma's beautful chrocheted blanket I decided to have a go myself! See it here................   http://emshappyhandiworks.blogspot.com/

To be honest, when I was about 19 I started chrocheting a purple and white (the 'in' colours in the 70's!) blanket - it was made up of loads of squares that had to be sewn together.  I was going to have it as a bed throw for when I married in 1973.  It never really got past the size of a cot blanket though! 
I don't know why I didn't finish it, it's too long ago to remember now - maybe I run out of wool and by then we'd moved to another county.

Anyway, I had to be shown how to start up again and my friend Sue sat down and showed me and I was off!  I decided on lovely colours of Heather, Bluebell, Purple and White and this was done in one continuous square, so much easier to do, I think.

Halfway through doing it - I saw a pattern that Sue had done for cushion covers and thought they were really lovely.  Sue had actually done one so I copied the pattern and decided to do some for Emma and Bob for their upcoming 10th Anniversary!

I chose a Chocolate Brown and a Turquoise which I thought would go with her recently decorated living room and beavered away at them, even on our week away on holiday and managed to get them done the night before I was due to see Emma to give her their card and other present!!!


This is the tops of the cushions to which I partly sewed up either side of the top and added a button from my button box.  Interestingly, the brown button belonged to a cardigan that belonged to Emma's late Dad!


It was a quite time consuming pattern that had to be counted out alot - so I was quite pleased that I'd actually been able to do them!  Emma was genuinely pleased that I had made these for her, so that made all my efforts worthwhile!


I then went back to my original blanket I was doing - I thought it would be nice to have one for my lap for when I use my wheelchair.  So this is the end result, which I am very proud of!


It seemed much easier to just keep going around in a square than doing individual squares!

Sunday, 15 May 2011

APRIL/MAY CARDS

Here are a few more of the cards I've made recently..........


This is a lilac background which had a circle cut out from my Big Shot machine and I put some silver mirror card behind it, then the fishermen and big fish cutouts.
I added some silver Happy Birthday stick ons and it was done - my friend Sue bought it.


This has a striped backing paper then a decoupage man enjoying a drink or two!


As I'd got in the swing of doing some male cards - I did this one with black polka dot paper that had an oval cut out, then I added a decoupage cricketer.  It has 'Man of the|Match' at the top and a Best Wishes in the oval.


This was a card I did for Mike to give to his Mum for Mothers Day.  I added a pretty flowery paper as a backing onto a cream base card.  I then added a double butterfly that I'd punched out from the same flowery paper and a plainer pink one.

Then I added a pretty little seaside card picture (I'd got this free from my cardmaking magazine!). I added a white and gold ribbon to the edge of it.
There's two cardboard sentiments - one has 'Special Mum' on the other has 'With lots of love'.


A similar card with another of the freebie card pictures on which I think are really quaint and old fashioned looking!  I used a cream base card to which I added some pink paper which had an oblong cutout and placed mirror card behind it.

Then I added another double butterfly (my fave punch at the moment!) I embellished the butterfly with some glitterglue and a little pink stone.
A ribbon was threaded on the card and then a sentiment card of 'Birthday Hugs' and a 'With love' one embellished with a pink stone.


This is the card I did for Mike for our 6th wedding anniversary.
I placed a dark purple backing card onto a blank base card and then cut out two different kinds of mirror card hearts in two sizes.

I then placed another heart sticker in silver onto the smaller heart. Another double butterfly (of course!) in silver and purple and then I added a white flowery stick on border all around it.

It had stamped on it 'On Our Anniversary' at the top and 'With love husband' at the bottom.

I added an insert with a poem I'd written for him and he loved the whole thing I'm pleased to say!


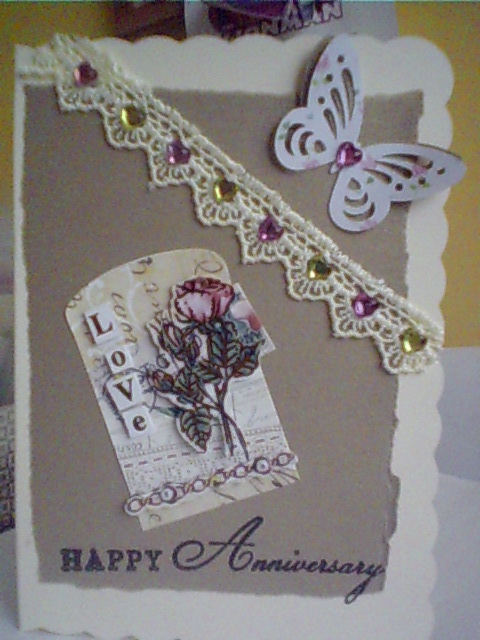
This is the card I did for Emma and Bob's 10th Wedding Anniversary which was the 5th May.  I tore some gold card and placed it on a cream base card.

I added a double butterfly one in gold and one in a flowery pink/blue paper.

I added a cardboard cutout with a rose and the words 'Love' on it and then added some deep cream lace that I added some pink and yellow stones on.

I then stamped 'Happy Anniversary' at the bottom.


So, theres my latest additions - next time I will show you the present I made for Emma and Bob!
Take Care all and please leave a comment if you wish.

Tuesday, 15 February 2011

FIRST TIME AT IRIS FOLDING!

I received my new Cardmaking & Papercraft magazine on Saturday and was browsing through it and saw an article on Iris Folding.  The picture was of a handbag for a Mother's Day Card.  A little further on I read about a competition they are holding to make a card for the Royal Couple Prince William and Kate, who are tying the knot on 29th April this year (a few days after our own anniversary!)

Anyway, I got to thinking and decided I'd do the Iris folding one but change the bag idea and here's what I came up with........

As you can see its lots of little strips of paper folded over and then planted over the tenplate.  I made my own heart shape one with my Big Shot and drew the same sort of lines needed for placing the papers. It's also a great way of using up scraps of paper that we may have lying around (as I do!)

I'm so proud of it!

Thursday, 27 January 2011

Got The 'Bug'!

Yep - I had a marathon card making couple of days! lol

I just need to find out how to sell some now to recoup all the money I've spent on my 'stash'!

I will just post the pics of the cards as I don't think I can remember every little detail - but I did use my beloved 'Big Shot' quite a lot!

This first one I backed with hand made lavender paper which I placed a navy card on top then some lovely lilac flowers - don't know how I would get it in the envelope though! lol


This is a lovely 3D type flower that you have to bend the petals to create a real-life look and I was very pleased with the end result!


so there we have my latest collection - just think I need to make more for men though!

Friday, 7 January 2011

More Cards I've Made!

Well, have finally found the time to get on here and post again!  I have been busy making christmas cards and thought I'd put some of the ones I made on here.

Also I have made some for my favourite charity to auction off on their 'Spectacular After Christmas Auction' which is open for listing items right now, but bidding is on 15th January - last time I entered my cards, I was proud that one of my cards actually sold for £10! Others went at a more modest £3.50 and £2.50 which all went to help the charity! Have a look on their site here: ( www.rescueremedies.co.uk)

So here are the cards I've made.. 1st one is one I made for my youngest sister Janet who got married on 22nd October 2010 to Chris - can't believe it's taken me so long to put this on here!


Now here are some christmas cards I made - apologies for them being a bit dark!


Well there are a few - I've not bothered to put all the details of each one on here but thought you may like to see the pics of them!

Now here are the ones I've made for Rescue Remedies Auction:-

This is a stacker card set I'd bought and they are quite easy to do as you just layer the picture bit by bit until you end up with the smallest piece.


This is another stacking dog picture card that I placed within a shaped lilac cut out made with my brand new Big Shot machine!
Also the little tag at the bottom was made with it on striped paper.


Unfortunately, this one has come out a bit dark but is actually a pretty blue colour circle (cut by my Big Shot again) with a cute dog stacking picture in the middle.


Finally, I thought I'd update you on my gorgeous dog Chesney - he is remarkably good for his young age and really good tempered!  Here's a quick snap I took of him and Mike, who was selecting the cards I've made to send off before xmas! (Note the newly decorated wall behind them!)  lol
Sal xx

Wednesday, 22 September 2010

A NEW PHASE

Last week (12th September) we became the proud owners of a lovely rescue dog!  We've named him Chesney and he's a handsome tan/white Staffordshire Bull Terrier.  He's very obedient and got on really well with my grandsons which was a relief!

He was about to be put down when a wonderful place called Rescue Remedies in Sussex rescued him in August.  He has been microchipped and neuteured and he is so well behaved for an 18 month old dog.

Here he is with his new toy - which has now been demolished! lol

Onto some cards I've made now............


This is the card I made for my eldest daughter Vikki and her hubby James's 10th Wedding Anniversary.  It was a cream base card to which I added some black scroll writing & roses paper that I covered in some fine netting. 
I then added a pink embossed paper that I placed a black velvet bow and a kissing couple on!  I added a pink heart that had moveable gold and red hearts inside it.
A gold 'Happy Anniversary' stick on sentiment and to finish I placed 3 diamontes in the bottom right hand corner.

We had a great time at their party and a wonderful meal out the next day with all my family there, so was quite special!


Here is a card that I made for my friend Sue who asked if I had a card for a baby boy - I didn't have one, so made this up for her on the spot! 
It has a blue base card to which I added some patchwork squares paper then cut out the words 'BABY' and placed it diagonally on the card.
I cut out a little boat, bottle and dungarees that I added. then I stamped 'Congratulations' on some yellow paper and placed at the top.  When I handed it to her she was delighted!